

Friday, July 25, 2008
on my wall
I revamped the one I made earlier, and now THIS is above our fireplace mantel. I love it. I'll take a pic of it actually framed...eventually.

Tuesday, July 15, 2008
pics
I know, I'm a slacker. but I put these together to frame above bree's bed. the pics in those frames are from when she was a couple weeks old :) there are a few other things I'm going to work on, but that's it for now...


Thursday, June 19, 2008
Dresses
I've finally gotten around to create something again. It's been a while! I found this fabric at Joanns and fell completely in love with it-I was so sad that there was only 2 1/2 yards left! I bought it all to make a couple dresses. There's just enough left over to do something really good with-I just need to think of what's "worth" making to use such awesome fabric. Maybe I can find coordinating stuff and make a bag, apron, small quilt...any ideas? What's your vote?


Tuesday, April 15, 2008
LOVE IT!
In my attempts to be more organized, I purchased these plain cardboard magazine holders for, surprisingly, magazines...and my piano music...and anything else I want to use them for. Well, I'm not all about putting cardboard on display, so I thought I'd pull a "bibbity-bobbity-boo" and see what happens.
I LOVE how they turned out!! I think I'm going to make more. These 4 are for my piano music. I'm going to make some for my Family Fun magazines-those are the only ones I keep-the others I just pull out stuff and toss.
Anyway. Just wanted to share!


I LOVE how they turned out!! I think I'm going to make more. These 4 are for my piano music. I'm going to make some for my Family Fun magazines-those are the only ones I keep-the others I just pull out stuff and toss.
Anyway. Just wanted to share!


Sunday, April 13, 2008
stuff I've done
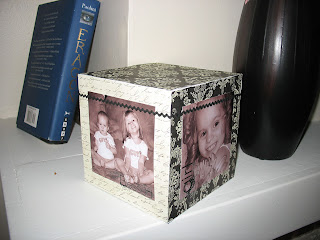
I completed my photo cubes. I actually had 2 to do. I did the set that I mentioned earlier-with the 2x2 wood cubes. MAN, that thing is a PUZZLE if you ever get the blocks out of order! I just threw all 8 blocks into the bag to bring them home when we finished, and it took a good 5 minutes to piece it back together to display! But Emma had a good time putting different pictures together. Then I had a 5.5 inch chipboard cube that I picked up on clearance sometime forever ago. I never posted pics of the awesome "L" my sister Adrienne made for me for Christmas-this is the 2 footer one that you get at Joanns. Isn't it GREAT? I took 2 pictures so you could see that it wasn't just a "frontal" effort-it's got dimension! She gave me some leftover papers from it, so I used them for my other cube. I didn't have much in the way of black and cream embellishments, so I used some rub-ons on the pictures (which you can't really see in these photos). I'm not sure if they show up so well, so maybe I'll have to pick up a few more embellies to spice it up. So, here are the pics!




I also made this to print out as a poster to hang in our stairway. I remember a couple years ago when I went back to Utah that there was a store in the mall making things similar to this and thought that it was the greatest idea ever. My friend actually ended up getting one for her house! So now that I'm into the digiscrapping world, I thought I'd give it a whirl. And since Costco prints 20x30 enlargements for only $10 I thought it was worth a shot. If anyone wants me to do one for them I've been thinking of trying this as a business. Of course, if I DID sell them, I'd have to get permission from the digital kit owners, so who knows. But if anyone wants to send me some pics, let me know and I'll try a few things.

*quote at the bottom says "Being deeply loved by someone gives you strength, while loving someone deeply gives you courage." Since it'll be a 20x30, I don't think there will be a problem reading it! :) But just in case you wanted to know what it says, there you go!
We got a few things accomplished this weekend and we are THAT much closer to finally finishing the minor things in the kitchen. Ya, it's almost a year later. Let's not talk about that. And we got some plants and a tree for our front yard, so my creative skills will be extending out to the great outdoors...let's see how that goes. I'm hoping to finish one of the girls dresses tomorrow night-I love the fabric, so I'll post a pic when it's done!


I also made this to print out as a poster to hang in our stairway. I remember a couple years ago when I went back to Utah that there was a store in the mall making things similar to this and thought that it was the greatest idea ever. My friend actually ended up getting one for her house! So now that I'm into the digiscrapping world, I thought I'd give it a whirl. And since Costco prints 20x30 enlargements for only $10 I thought it was worth a shot. If anyone wants me to do one for them I've been thinking of trying this as a business. Of course, if I DID sell them, I'd have to get permission from the digital kit owners, so who knows. But if anyone wants to send me some pics, let me know and I'll try a few things.

*quote at the bottom says "Being deeply loved by someone gives you strength, while loving someone deeply gives you courage." Since it'll be a 20x30, I don't think there will be a problem reading it! :) But just in case you wanted to know what it says, there you go!
We got a few things accomplished this weekend and we are THAT much closer to finally finishing the minor things in the kitchen. Ya, it's almost a year later. Let's not talk about that. And we got some plants and a tree for our front yard, so my creative skills will be extending out to the great outdoors...let's see how that goes. I'm hoping to finish one of the girls dresses tomorrow night-I love the fabric, so I'll post a pic when it's done!
Friday, April 4, 2008
Boxes
I heard about this cute idea to make a "newborn" box for each child. You decorate a small box and include different things like the birth story, the baby "stats", feelings from Mom and Dad, copy of the birth certificate, maybe some congratulatory cards you were given, and pictures, etc. Whatever you want to put in it. The article also suggested getting tiny paper mache boxes and put the hospital bracelet and any other small trinkets in them-maybe lace or fabric from the blessing outfit. So I made a few tiny boxes the other night. Super easy, nothing too crazy. But it'll get me on track to actually create my baby boxes. Since my friend is moving and wants to use up her craft supplies, she's having a craft night every week-talk about helping me get my projects done! So I did these boxes one night, and I made a jewelry holder another night (HERE is a picture of what I made, except for my frame is brown-sorry if the link doesn't work-I'm not sure if her blog is private or not). I'm probably going to make the crayon roll that she shows on her blog also. Next week we'll be making those photo blocks-the ones where there are a bunch of 2 inch blocks put together to make a big block and you cut up photos and glue them on, then you can rearrange the blocks to show different pictures. Maybe that made sense? I also picked up some super cute fabric to make some dresses and outfits for the girls. Maybe I'll finally get some projects finished!


Saturday, March 15, 2008
blah blah blah
The dinner plan worked out pretty well for me. I didn't really like the melon relish-my flank steak turned out AWESOME and I thought the melon stuff kind of ruined the flavor. Give me a hunk of meat without any sauce any day and I'm a happy woman. I don't like gravy on roast, I don't like steak sauce on steaks, I don't like cheese on my burgers...they all take away from the flavor of the MEAT. Enough of the ranting. The homemade mac & cheese was missing something and I couldn't quite put my finger on it, so that won't be a repeat.
This last week was BBQ chicken pizza, using some smoked gouda that I purchased a while ago-that and red onions are great for that type of pizza. We also did beef stew on a cold wintry day, grilled chicken sandwiches, and a yummy grilled chicken mexican caesar salad (the el torito one-mmmmm). And I'm proud to say that since I posted that dinner plan, the only time we've gone out to eat was last night for our date! Fast food doesn't even sound good to me. My friend Anna brought a happy meal over for emma yesterday and the nuggets that she didn't eat tasted pretty decent-but that's my only slip-up!
On to craftiness. I've started digital scrapping, but had all my paper stuff to finish also. I've shared my method with a few people, but here it is for others. I own Becky Higgins' "Sketches" book/magazine. She's got 3 out now, the 3rd was just released. I have the 2nd issue. If you aren't familiar with Sketches, the layout of the book goes like this: She starts with a section of layouts for 3-5 photos. The top of the page shows a "sketch" of the layout, with the measurements of each picture. Then on the pages are examples of people's layouts using that sketch. And she goes on throughout the book with sketches for 6-7 photos, 8-9, 10-14, and 15+. There are a few sketches for each grouping. So, what I did before I started digital scrapping is this (and I usually have a notebook in front of me to write down stuff):
1) Since I haven't already printed my pics, I open my pictures folder on the computer and I go through an "event" that I want to scrap and pick out the pictures that are going in the book. In my notebook I write the event and the number of pictures I've chosen.
2) I count the pictures, and look for that section in the Sketches book, and pick a sketch that I'm going to follow. In my notebook I write the page number of the sketch next to the event name.
3) I open photoshop and crop or resize all the pictures for that "event" to accomodate the sizes in the sketch--make sure to keep everything at 300 dpi so the quality of the picture is still high. MAKE SURE YOU DO NOT SAVE OVER YOUR ORIGINAL PICTURE!!! I print my pictures at Costco, and if you're resizing pictures to be small ones, like 2 inch squares, it's cheaper to fit a bunch on a 4x6 than to fit a bunch on an 8x10. So, I resize them and fit as many as I can on each blank document (either 4x6, 5x7, or 8x10). If I don't fill an entire blank document, I just keep it open and add to it as I go through each event and layout until it's filled, then I save them. If you are unfamiliar with how to do all this, make a comment letting me know--I'll post step by step instructions if needed.
4) After I've finished resizing all the pictures and I've saved all the new files, I upload them to costco.com's photo center and get them printed.
5) When I have the pictures I cut them up and separate them into piles with each event. Then I place them in a baggie with a post-it of the page number for the sketch.
6) Then I go through my papers and pick out 2 solid cardstocks and the coordinating patterned paper that I'll be using for the layout (and any other embellishments that you want, if you already have something in mind for the layout), and put all those in one 12x12 page protector with the baggie of pictures.
7) Now, whenever I go to a friend's house for a hobby night I can just grab a few page protectors full of layouts, my paper cutter, and adhesives and the sketches book, and I can actually get something done!
It sounds like a lot of work, but it's actually REALLY easy. The other night I was babysitting for a friend and I put together probably 20 layouts in a few hours. Of course, this doesn't include journaling and embellishments. This is all paper piecing and placing the pictures on the layouts. For all the pictures that I had already printed before I started this system, I kind of do the same thing--I pick out how many I want to scrap, pick a sketch, then just alter it a little bit to fit the pictures I already have. It means I usually can't use a sketch that has a large print on it b/c most of the pics I've already printed are just 4x6. But it's easy to adjust, and the paper piecing and embellishment ideas in the book are good inspiration.
So, that's what "crafting" I've been consumed with lately. After I got those million layouts done the other night I've been spending Bree's naptime doing rub-ons and alphabets, etc, and adding page titles and embellishments. Now they're just waiting for the journaling...but not all of them need it-the pictures tell the story enough. I really just want to use up all my paper supplies so I can move on with the digital stuff. I'll still do paper scrapping for certain projects, b/c I really like the hands on work required for it. I've still got to finish (well, I guess I have to actually START something in order to finish it) our wedding album and Dave's mission. My goal, after getting these layouts finished, is to do one digital layout a day during Bree's nap. It's totally doable :)
And, for your viewing pleasure, here are some layouts-I just laid my book out and took pictures since I don't have a 12x12 scanner and I'm too lazy to take them out of the page protectors to prevent glares. Remember...no journaling or embellishment has been done yet. In other words, don't judge too harshly :) The first are layouts using my system. The last few layouts are ones I adapted to a sketch b/c I had already printed them out before starting my "system."


This last week was BBQ chicken pizza, using some smoked gouda that I purchased a while ago-that and red onions are great for that type of pizza. We also did beef stew on a cold wintry day, grilled chicken sandwiches, and a yummy grilled chicken mexican caesar salad (the el torito one-mmmmm). And I'm proud to say that since I posted that dinner plan, the only time we've gone out to eat was last night for our date! Fast food doesn't even sound good to me. My friend Anna brought a happy meal over for emma yesterday and the nuggets that she didn't eat tasted pretty decent-but that's my only slip-up!
On to craftiness. I've started digital scrapping, but had all my paper stuff to finish also. I've shared my method with a few people, but here it is for others. I own Becky Higgins' "Sketches" book/magazine. She's got 3 out now, the 3rd was just released. I have the 2nd issue. If you aren't familiar with Sketches, the layout of the book goes like this: She starts with a section of layouts for 3-5 photos. The top of the page shows a "sketch" of the layout, with the measurements of each picture. Then on the pages are examples of people's layouts using that sketch. And she goes on throughout the book with sketches for 6-7 photos, 8-9, 10-14, and 15+. There are a few sketches for each grouping. So, what I did before I started digital scrapping is this (and I usually have a notebook in front of me to write down stuff):
1) Since I haven't already printed my pics, I open my pictures folder on the computer and I go through an "event" that I want to scrap and pick out the pictures that are going in the book. In my notebook I write the event and the number of pictures I've chosen.
2) I count the pictures, and look for that section in the Sketches book, and pick a sketch that I'm going to follow. In my notebook I write the page number of the sketch next to the event name.
3) I open photoshop and crop or resize all the pictures for that "event" to accomodate the sizes in the sketch--make sure to keep everything at 300 dpi so the quality of the picture is still high. MAKE SURE YOU DO NOT SAVE OVER YOUR ORIGINAL PICTURE!!! I print my pictures at Costco, and if you're resizing pictures to be small ones, like 2 inch squares, it's cheaper to fit a bunch on a 4x6 than to fit a bunch on an 8x10. So, I resize them and fit as many as I can on each blank document (either 4x6, 5x7, or 8x10). If I don't fill an entire blank document, I just keep it open and add to it as I go through each event and layout until it's filled, then I save them. If you are unfamiliar with how to do all this, make a comment letting me know--I'll post step by step instructions if needed.
4) After I've finished resizing all the pictures and I've saved all the new files, I upload them to costco.com's photo center and get them printed.
5) When I have the pictures I cut them up and separate them into piles with each event. Then I place them in a baggie with a post-it of the page number for the sketch.
6) Then I go through my papers and pick out 2 solid cardstocks and the coordinating patterned paper that I'll be using for the layout (and any other embellishments that you want, if you already have something in mind for the layout), and put all those in one 12x12 page protector with the baggie of pictures.
7) Now, whenever I go to a friend's house for a hobby night I can just grab a few page protectors full of layouts, my paper cutter, and adhesives and the sketches book, and I can actually get something done!
It sounds like a lot of work, but it's actually REALLY easy. The other night I was babysitting for a friend and I put together probably 20 layouts in a few hours. Of course, this doesn't include journaling and embellishments. This is all paper piecing and placing the pictures on the layouts. For all the pictures that I had already printed before I started this system, I kind of do the same thing--I pick out how many I want to scrap, pick a sketch, then just alter it a little bit to fit the pictures I already have. It means I usually can't use a sketch that has a large print on it b/c most of the pics I've already printed are just 4x6. But it's easy to adjust, and the paper piecing and embellishment ideas in the book are good inspiration.
So, that's what "crafting" I've been consumed with lately. After I got those million layouts done the other night I've been spending Bree's naptime doing rub-ons and alphabets, etc, and adding page titles and embellishments. Now they're just waiting for the journaling...but not all of them need it-the pictures tell the story enough. I really just want to use up all my paper supplies so I can move on with the digital stuff. I'll still do paper scrapping for certain projects, b/c I really like the hands on work required for it. I've still got to finish (well, I guess I have to actually START something in order to finish it) our wedding album and Dave's mission. My goal, after getting these layouts finished, is to do one digital layout a day during Bree's nap. It's totally doable :)
And, for your viewing pleasure, here are some layouts-I just laid my book out and took pictures since I don't have a 12x12 scanner and I'm too lazy to take them out of the page protectors to prevent glares. Remember...no journaling or embellishment has been done yet. In other words, don't judge too harshly :) The first are layouts using my system. The last few layouts are ones I adapted to a sketch b/c I had already printed them out before starting my "system."


Subscribe to:
Posts (Atom)

